Sunday, March 31, 2024

YOUR SO SWEET

Hi everyone! Today I'm sharing a card using a new fruit stamp and die set from Scrapbook.com. I used to love doing CAS cards until distress came into my life. I really enjoyed leaving so much white space. 


For my card, I used a new stamp set called You're So Sweet from Scrapbook.com. I have really loved seeing how others have used it and couldn't pass it up. 


I used Catherine Pooler inks in glitz, limoncello, tiki torch, and catching rays for my fruit. Keeping the sentiment in a nice bold black. I did fill in around the edges with a lemon outline as to me it felt a bit too stark and empty. 

Thanks for stopping by!

Sunday, March 17, 2024

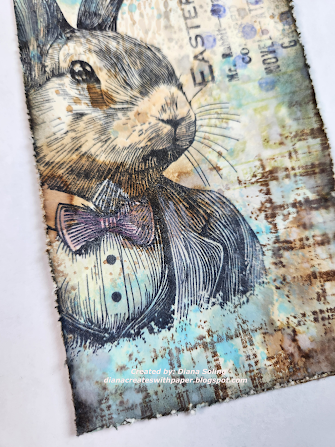
Having Fun With Mr. Rabbit

 Hi everyone! It's been a long minute since I last posted. With so much going on over the last couple of years I had to take some time away from crafting and sharing. I have SO missed being in the community learning and sharing. 

Today I'm sharing a tag I created while watching the replay of Tim Holtz's last video. I wasn't able to watch it live, but am so glad I went back. In case you missed it, here it is. 


I used mostly all of the same products that Tim used, except I did change a color or two. The distress world has always been something I want to really get into but have such a hard time figuring out color combos and what products work best. Watching his videos has been a huge help. 


I am in love with Mr. Rabbit. He is so sweet and very dapper. I can't wait to see what others have come up with. 


I haven't quite decided if I am going to make a card out of this tag or use it as a bookmark. I can already see he would make me smile each time I opened my book. 


THANKS FOR STOPPING BY!!

Saturday, April 9, 2022

STAMPNATION WEEKEND CHALLENGE CARD

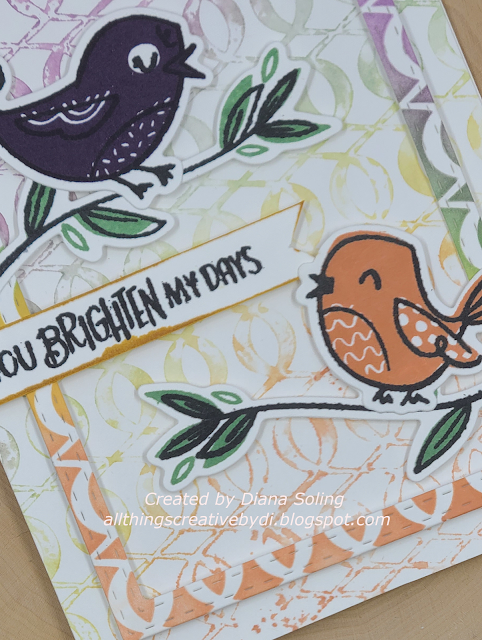
 Hi everyone! I created a fun card for the weekend challenge over at StampNation. The challenge was to use critters. I chose a fun bird set. 


I wanted to create something fun and different (for me anyway). I used a stencil to create a frame and then spritzed the stencil with water and laid a plain piece of white cardstock on top to transfer the remaining color. 


The background is my favorite part of this card. I haven't used this technique before but will again. 


I used Catherine's color wheel to choose the ink colors. Using the Tetrad colors was new for me. The only thing I would do different is maybe choose a lighter purple for the one bird. 


THANKS FOR STOPPING BY!

Saturday, January 15, 2022

SN BirthYAY CARD CHALLENGE SUBMISSION

 Hi everyone! It's been a minute since I've last posted.

This month is Stampnation's 11th birthday! Catherine Pooler has an amazing community where we can get together and share ideas, learn new things and so much more. 

Today I'm sharing a card that was created using this sketch


This was a fun one. My card came together rather quickly. I did some ink blending on the back panel to bring in a fun Valentine feel. 


The back panel was created using a fun die. I ink blended and adhered down to my card base. 
I stamped the "punched" circles with different images and sentiments and then adhered them with dimensional foam to give some height. 


I like how the background stripes peek through under the circles. I finished it off by stamping some chopsticks and adding them to the corners of the card. I didn't feel I needed to add any other "bling". 


Supplies:
Catherine Pooler Designs:
stamps/dies: hey there dumpling
patterned paper: I love you soy
inks: be mine, samba, do-si-do, mint to be, sand castle, black jack
Close To My Heart: 
dies: multi circle windows

THANKS FOR STOPPING BY!


Saturday, October 23, 2021

URBANIZE AN OLD CHRISTMAS CARD

 Hi everyone! Today I'm sharing a fun card I made for the challenge over on Cathrine Pooler's Stampnation site! Each week until the end of November there will be a new challenge to create Christmas cards. 

This week's is to urbanize and old Christmas card you've created. 


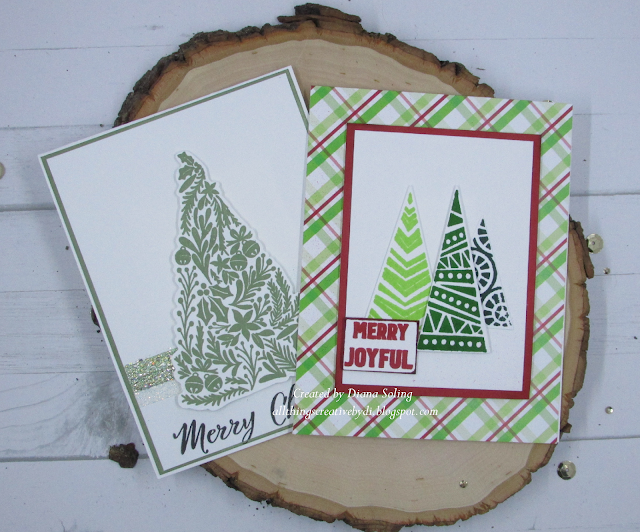
Here is the card I decided to re-make. I remember making this last year. I forgot how much I loved this tree! The glitter strips are what make me happy. Such a subtle accent. 


And here is the card I created today. I used bright colors and background paper. I also used direct to paper inking to create the red piece behind the trees. 


And here they both are side by side. Such a big change. 


THANKS FOR STOPPING BY!!!


Wednesday, September 29, 2021

THANKS CARD WITH THE PAPER SHELTER

 Hi everyone! Today we have a fun challenge over at 

Our sponsors for today's challenge is:

The Paper Shelter

(prize: 3 digi images of winners choice)

Twinkle Lane Designs

(8 pound store voucher)

For my card I got to use Owl Whisperer from The Paper Shelter. I decided to use the colored image as well as the background paper that was provided. 


I kept the card pretty simple. I embossed a white panel with a 3D cloud embossing folder and ink blended. I added the background paper and colored image. 


For the thanks I did a direct paper ink to create the purple sentiment. I love this as you can get the exact color you want without having to buy new paper. 


THANKS FOR STOPPING BY!!


Wednesday, September 15, 2021

STAY PAWSITIVE W/INKY STAMPER

 Hi everyone! I'm sharing my second card for my Guest Designer spot at

I used the Dog stamps and dies to create this fun card. I wanted to create a scene to show just how happy this doggie is to have all his favorite stuff!!


To create the "room" I used paper from a fun 6x6 paper pad from Doodlebug Designs called buffalo check-wood grain. Using the brown wood grain for the floor and a fun blue check for the wall. 


To create the blanket I cut a small 2x3 square from the pink check and cut slits in the ends to create the fringe (my dogs would so chew up that fringe).


I used dies to create the picture frames and did a direct to paper with ink pads to create custom colored frames. 


He's just so darn cute! That face makes me so happy!!

Thanks for stopping by! I hope you'll check out Chelsea's store at


Wednesday, September 8, 2021

HAPPY BIRTHDAY YOU OLD GOAT!

 Hi everyone! I'm here sharing my first project for my guest designer spot over at Inkystamper. Click the image and join the group!


I have been using Chelsea's stamps for a few years now and I love them. They are so unique and fun to play with. My first card for my September Guest Designer spot is using this fun Goat stamps and dies. 


I used the brick stamp and made the background using a dark grey ink. I wanted to color in, slightly, a few of the bricks and then took a blending brush to shade the edges. 


I am so happy with this card. When I showed it to my hubby he laughed so loud at the sentiment!!


I used my copic markers to color in the goat, birthday hat, and the bricks. 


I hope you'll check out the website to see all of her amazing stamp sets.

InkyStamper Store


Saturday, August 21, 2021

HELLO BESTIE 3D EMBOSSING DAY 1

 Hi everyone! I'm sharing a fun card I made for day 1 of a 3-D embossing class I'm taking in the Altenew Academy.


I am loving all of the new 3-D embossing folders that Altenew has come out with. I can't wait to see all of the fun stuff we'll learn. 


I used the new Botanical 3D embossing folder from the new Lush Garden creativity kit. After dry embossing the main panel I added strips of color by using low tack tape to mask off areas. 


I used a total of four colors for the entire card. Volcano lake, frayed leaf, coral berry, and warm sunshine. I blended the color in strips using the detail blending brushes. This took a bit more time to get the color down but it helped keep the color where I wanted. 


Here's a closer look at the panel. To create the thin strip of pink I ran the coral berry ink pad along the edges of the base panel. I like how it helps the embossed panel pop. 


I finished the card by adding a fun sentiment from the modern hello stamp set. I love how the sentiments stack up! 

THANKS FOR STOPPING BY!!


Sunday, July 4, 2021

STUNNINGLY STYLED STENCILS + 2 CARDS

 Hi everyone! I'm back today with projects for my third class in my level 3 Altenew Certification. I has so much fun learning different techniques for using my stencils. Things I never would have even considered. 


I always forget I have so many stencils and taking this class really helped me to see so many great ways to use them and get them out of the box. 


This first card was a fun. I ink blended the background over the stencil and then dry embossed it. I haven't dry embossed before and I'm glad it came out okay. I did have to purchase plates though as I didn't have the right sandwich for my machine.


This card has so much texture. I usually don't add so much dimension but this card just called for it. 


I wanted to make this next card because I really liked the technique of mixing the embossing paste with the watercolor brushes refills. 


I didn't think the colors would pop as much as they have on this card. I couldn't be happier with how this card came out. 


I used sunkissed, lagoon, and midnight violet re-inkers to create the stenciled area. 


I made such a mess with them but the colors melded together so well. I trimmed out the image once it completely dried.


I sprinkled silver embossing powder and heat set. When I started using my heat tool the colors started to get brighter as they dried. It was pretty neat to watch the color brighten. 


I finished the card with a embossed sentiment and some white satin sequins. This is a technique I will definitely be using again. Each stencil and color combo will give something different and fun!

THANKS FOR STOPPING BY!!
Sunday, June 27, 2021

LAWN FAWN CHALLENGE #103 LITTLE THINGS


 Hi everyone! Today I'm sharing a fun card for the latest Lawn Fawn challenge.

(click photo to go to challenge)

I decided to make a Christmas card lol. I was looking through my tiny images and the tiny Christmas and tiny gingerbread called out. I haven't used these two sets yet, so why not!


I cut out the foursquare backdrop out of white cardstock. I used crackling campfire and firebrick to create the main piece. For each little square I used salvaged patina, speckled egg, kitched flamingo, and rustic wilderness distress oxide inks. 


 After adhering the little square backgrounds in I sprayed the whole panel with water and blotted it off with a paper towel. Once it dried I was able to add my colored images. 


For the "floors" I cut out another foursquare panel. Using just the inside pieces I cut the bottom using the hill from sandy beach accent dies. I colored them each in and adhered them to the panel. 


I finished the card with some Christmas colored twine. I really enjoyed playing along!

THANKS FOR STOPING BY!!

YOUR SO SWEET

Hi everyone! Today I'm sharing a card using a new fruit stamp and die set from Scrapbook.com . I used to love doing CAS cards until dist...