Hi everyone! I'm here sharing my first project for my guest designer spot over at Inkystamper. Click the image and join the group!
I have been using Chelsea's stamps for a few years now and I love them. They are so unique and fun to play with. My first card for my September Guest Designer spot is using this fun Goat stamps and dies.
I used the brick stamp and made the background using a dark grey ink. I wanted to color in, slightly, a few of the bricks and then took a blending brush to shade the edges.
I am so happy with this card. When I showed it to my hubby he laughed so loud at the sentiment!!
I used my copic markers to color in the goat, birthday hat, and the bricks.
I hope you'll check out the website to see all of her amazing stamp sets.
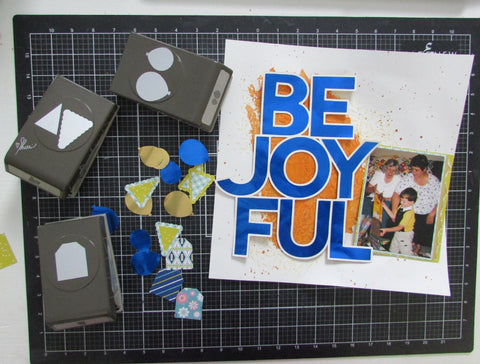
Hi everyone! Diana here today with a fun mixed media layout using Rinea foil, paint, embossing paste and some good old fashioned paper punches.
I found this old pic of my oldest son with his Grandma and Great Grandma on his 5th birthday and knew I needed to create a layout with this treasure. We've lost both in the past 10 years so this is such a special gift.
I started my layout by cutting this great title cutout from the sillouette design store. I then glued it down to my foil and started cutting it out. I then prepare my background cardstock by adding white gesso.
I left this to dry. Once it was I picked out a fun confetti stencil, embossing paste, and a fun yellow ink refill to create texture on my background.
I then smeared it on my background through the stencil. I moved it around three times. After it dried I realized there just wasn't as much color as I was hoping for.
I pulled out some yellow/gold paint and added some water. This paint has such a great shimmer to it. I started adding it over some of the embossed background. I then did some splatter with what I had remaining on the pallet.
I pulled out some of my "birthday" themed punches and some different patterned papers and started punching different shapes. I then adhered my title and picture down.
Here are some close ups of my finished layout with all the elements added on.
I love the how shiny the foiled paper is. Really adds a little more pizazz to my layout.
I used two different patterned papers under my photo as well as some gold foiled paper with a torn edge to give some texture.
This is the first time I've used a cut file like this on a layout and i must say I am hooked! I can't wait to cut some more and see what comes of them!!
Hi everyone! I'm here today to share a fun card I made for
I totally forgot that I needed a project for today and had to quickly come up with something so I wasn't late to the paw-ty! I used two challenges to help me get this card going.
Challenge #178 Our theme for the new challenge is "Cute Critters"
This is what I came up with on the fly...I'm really happy with it. The colors are so bright and I haven't used this stamp set yet so it was great to pull out new stuff and put it to use.
I used a fun circle card cover plate in a light blue and followed up with a red and green strip and the fun confetti to but over the red.
I used color pencils in the same colors as the papers to color in the balloons and the pup's accessories.
For my project today I used Jasper's Cupcake digital stamp. I used pink and blue ink and lightly added color by sponging it on. Once I had done that I sprayed the ink that was remaining on my media mat and then smooched my panel to help blend the colors more and give a bit more texture.
I had a lot of fun making this card and love the bright vibrant colors. That pup is to darn cute!!
Good morning! I am so excited to share with you my Altenew Academy level one final project. This has been a labor of love. I've had so much fun creating these gift sets. They were a lot of work but so worth it. I can't wait to give them as gifts during this social distancing that we are going through.
I made a video showing one of the many new techniques I've learned while taking the classes as well as how to make the boxes pictured above. This is my first ever video tutorial so I hope you enjoy it. These boxes are so easy to make and so much fun.
For my level one final project I was to make one set of feminine and masculine cards using three of the class techniques I've learned, as well as creating packaging for each set of cards and using something that's been recycled either on one of my cards or for the packaging. Here is what I chose for my cards.
~Level 1/2 all about layering
~easy die cutting techniques
~Let it Shine
~recycled package paper to wrap my cards in like a gift
~handmade gift boxes
When I started these two sets I thought for sure the masculine set was going to be the tougher of the two, but it turned out to get the easiest and the quickest to get finished. For the first time the feminine cards to me an extra day to complete.
For my masculine set of cards I chose to do embossing with die cuts. For all six of the cards I embossed a cover plate for the background. For this card I stamped the image on the background before embossing to ensure I'd get good coverage. I then went in with a water color brush and added ink from my ink pad to a few of the images.
For the first three I decided to use the Best Dad stamp set. I changed up the sentiments and images but kept the same colors and background techniques.
I love to add color to the backgrounds using a blending brush or mini ink blending foam and ink. It's a great way to get varying shades of the same color or you can blend several shades and get an ombre look.
This cards was my husbands favorite. I used the glitter washi tape to ground my image and make a sort of "shelf" for it to sit on. I have to say this is one of my favorite new stamp sets.
I then switched up the main images to those in the Layered Cupcake stamp set. I kept the embossed image on this card simple and added color by doing a direct to paper inking. I used two different ink pads and dragged them across white cardstock to get the light and dark blue pieces. This is a great way to get matching cardstock if you don't have any on hand.
I kept the background white on this card as well and added all the color via the cupcakes, dark navy strip and sequins. I added clear embossing powder to the navy strip to give a bit more shine.
My final masculine card was so much fun to make. I started with stamping the two background cupcakes and then die cutting out two gold ones. I did cut the gold ones down to fit better and not add to much bulk behind the main image. I wanted the front cupcake to really stand out so I embossed in antique gold embossing powder and then stamped the layers.
I designed my feminine cards two at a time. I used my cover dies as stencils for this whole set. The video above has a tutorial showcasing this technique for you.
These two cards both use the shutter cover die. After I used it to add some color to the second photo I cut it in half and added part to the bottom of this card.
For these cards I used two die cut cover dies. One in the white that I used to stencil and then one in the brushed gold cardstock. I used the gold hearts to fill in some of the spaces on the second card to give some additional dimention.
I love how the thanks sentiment frames out the center of the card. I did direct to paper for the pink cardstock to help make the main panel "pop". I love the mono chromatic on the second card. Between the card base and the cover die it blends together nicely. I die cut the hello die four times and stacked them on top of each other to give it more height.
I inked up have of this panel and then added embossing ink and platinum ink to the other half and heat set it. I then added a pink strip to bring them together. I added just a couple of green leaves so I didn't overwhelm the rest of the card. I kept the second card pretty simple in the colors. I added brushed gold paper behind my cover die panel and stamped my flower images in different shades of black. I added some antique gold to the flower using a water color brush and lightly brushing it on the petals.
Here's a few closeup's of the cards and boxes. This was a really fun challenge.
While sitting here thinking how different this Easter has been to previous years I thought I should get a card made for my son's upcoming birthday at the end of the month. I can't believe he's going to be 18 and I'll have no more littles.
I chose the challenge over at "Just Us Girls" for this card. I enjoyed doing it as I don't usually stray from the standard A2 size cards.
I made a 5x10 sized square card and used the largest stitched square die from The Stamps of Life to create the sentiment piece. To create the matching card base and Happy sentiment I used the direct to paper technique. This is a great way to get matching cardstock every time.
I stamped the mountains of the base and then stamped them two more times and cut them out. The top layer is popped up to give added dimension.
Not sure if your seeing a theme here...but I love adding dimension where ever I can. I cut the happy out twice from white cardstock and adhered the three layers together. This saves on dimensional dots and uses up any left over cardstock that you'd end up throwing away.
Here's one last look at all the different layers. I only used one sheet of cardstock to create this card and all I threw away were the scraps.