Showing posts with label 1 page layout. Show all posts

Thursday, January 7, 2021


Hi everyone! Diana here today with a fun mixed media layout using Rinea foil, paint, embossing paste and some good old fashioned paper punches. 

I found this old pic of my oldest son with his Grandma and Great Grandma on his 5th birthday and knew I needed to create a layout with this treasure. We've lost both in the past 10 years so this is such a special gift. 

I started my layout by cutting this great title cutout from the sillouette design store. I then glued it down to my foil and started cutting it out. I then prepare my background cardstock by adding white gesso.

I left this to dry. Once it was I picked out a fun confetti stencil, embossing paste, and a fun yellow ink refill to create texture on my background.


I then smeared it on my background through the stencil. I moved it around three times. After it dried I realized there just wasn't as much color as I was hoping for.


I pulled out some yellow/gold paint and added some water. This paint has such a great shimmer to it. I started adding it over some of the embossed background. I then did some splatter with what I had remaining on the pallet.

I pulled out some of my "birthday" themed punches and some different patterned papers and started punching different shapes. I then adhered my title and picture down. 

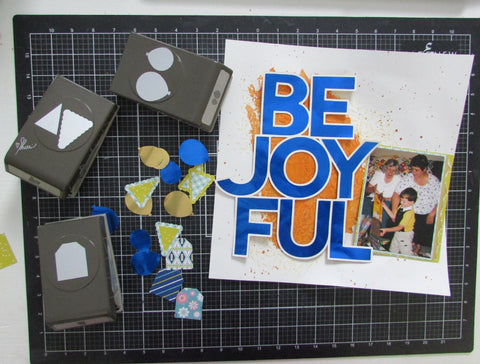
Here are some close ups of my finished layout with all the elements added on. 

I love the how shiny the foiled paper is. Really adds a little more pizazz to my layout. 

I used two different patterned papers under my photo as well as some gold foiled paper with a torn edge to give some texture. 

This is the first time I've used a cut file like this on a layout and i must say I am hooked! I can't wait to cut some more and see what comes of them!!

Supplies:

Cobalt/Gold Glossy Foiled Paper

balloon, tag, and pennant paper punches, paint, water, embossing paste, confetti background stencil, patterned paper. 

Monday, September 7, 2020

REMEMBER...CAPTURE TODAY

 Hi everyone! Welcome back! I have a project to share with you today for 


I used the brand new VINEYARD FOILED PAPER pack for this layout. I'm loving these colors. There's so many different things you can do with them. I can picture making wine glasses with these colors inside as the wine. 

For my project today is a 12x12 scrapbook layout.


HOW TO:

1) Choose your cardstock, foiled paper, stamps, dies, inks, punches and embellishments
 
2) I used Tim Holtz pumice stone distress ink on the edges of the white cardstock and a bit in the center. 

3) Using the Rinea Ghost Ink stamp your image/images onto the Merlot/Melot starstruck foiled paper. Making sure to stamp straight down and with slight pressure so the stamp doesn't move. If you go to quickly the image with move about your foiled paper and your image will be blurred. 

4) Let the ink sit for a minute or so. You'll start to see the color lifting and the underlying silver will show through. Using a towel/paper towel lightly rub the images to remove the remaining color. This gives a really nice effect with minimal effort. 


5) Using either dies or paper punches cut out your designs. I used a tulip punch from Stampin' Up! and word dies from Altnew for my layout.


6) Once you have all your cut out items you are ready to start assembling your layout. I cut the merlot/merot foiled paper down to 11 1/2" x 4" and then tore the inner long side. Mat your photo if you'd like. I used white and then grey cardstock to help give a little "pop" to my photo.


7) Before adhering down the merlot/merlot piece I used a strip of violet/violet to add a bit of color under my photo as well as on some of the tulips. I also flipped the ruby/gold over and cut some tulips so I could add a bit of gold to the tulips.


8) I added piece of the gold/gold starstruck foiled paper behind my matted photo. Once I added a piece of the torn merlot/merlot behind the photo I was ready to adhere it down. I used an adhesive backed foam on the back of my photo to give some dimension (and it made it easier to add embellishments under it)


9) Now your ready to add your title/subtitle and punched embellishments. I also created a tap for under my picture with a sentiment and image. Adding in the foiled paper hearts really helped tie everything in and finished the layout. 


THANKS FOR STOPPING BY!!!

Friday, August 7, 2020

OH MY! AND A LAYOUT CHALLENGE

Hi everyone! Welcome back to another great challenge over at


Today's challenge is a fun sketch challenge inspired by one of our design team members Rainny. 


For my layout I pulled out some old photos my son took of my hubby and youngest son a few years ago. He gave them some funny faces and even had my youngest steaming from his ears lol. I've been wanting to scrap these and was just waiting for the perfect layout. 


I did switch mine up a bit. I wanted my larger pieces to be the pictures and the smaller the title. I mostly used patterned paper. I kept the layout simple as the paper has a lot going on. 


THANKS FOR STOPPING BY!!


Friday, May 29, 2020

Siblings

I found this picture of my mother-in-law and some of her siblings. I couldn't help but create a layout using it. My husband doesn't really have a lot of layouts for his family so I'm staring with some to get a book ready. 

I created this layout for a Altenew class. It was all about floral's and gathering all the items you'll need before hand so that you can go right into crafting. Here is a pic of my items.


I started by using the mega bloom stencil to create the background of my layout. I used wisteria on the inside of the bloom and added hydrangea to the edges. 


I'm very happy with how the blooms came out. Next time though I'm going to tape around the whole edge. I did get some ink where I didn't want but I was able to cover it up with elements.


I used the watercolor halftone dies and painted fantasy washi tape to create some of the elements on my page. I love that Altenew has washi tape that coordinates with dies. 


I also used the watercolor halftone stamp set to create a couple of smaller solid colored images. 


I wanted a bit more color so I cut out some blooms from the summer garden 6x6 paper pack. I added some of the leaves behind the washi floral's. 


Here is the finished layout. I used mega brush alpha for the title and some sentiments from fancy frames and tabbed stamp sets.


THANKS FOR STOPPING BY!!

Friday, May 22, 2020

This Love Story

Hi everyone? Have you tried the triangle technique on your layouts yet? I had a girlfriend show me her finished project and I knew I had to give it a try.  SO much fun!!!

I found these older photos of my kids and mother-in-law. Both of these were taken at two different baptisms. 1999 and 2002 for my younger two children. So hard to believer they are all 23, 21 and 18!!


The best part about this layout is that it only takes two pieces of paper/cardstock. I did end up using a third piece because I cut one of the 6x6 patterned pieces by accident. 


I dug through my stash and found these gold words. They were perfect for my layout. They also included the golden hearts as well. 


Of course, after I made this layout, I found other paper I would have loved to use for these photos. Oh well. I'll just have to dig through more pics and make more of these layouts!


THANKS FOR STOPPING BY!!

Sunday, March 29, 2020

March 2020 Altenew Inspiration Challenge


I spent some time today doing some more work with my mom's old photos. I found the March 202 Inspiration Challenge over at the Altenew Blog and thought I'd give it a go.  The colors are perfect for spring and go well with my black and white photo.

I wish I had some succulent stamps, as I would have loved to incorporate them into the design.  


Here is my finished layout.  I used clear gesso in the middle so I could stencil and paint without warping my cardstock. This is the first time I tried this and am pretty happy with it.  I knew I wanted to use the sentiment from the Bloom & Grow stamp set as a title. My mom and her siblings were very close and stayed close for quite a long time. 


I used Delicate Tiles to create the half border on the left hand bottom edge and then cut strips from the Reflection paper pack to give a little separation.  The woodgrain pattern really helps break up all the blues. I added some splatter using the silver spray. I made a mess when I started adding them lol. 


Here is a closer look at the painted dahlia made using the new Bursting Dahlia stencil from Altenew. I don't even mind that the blue paint "bled" a little. It helps make it look more watercolored.  I used silver encore ink to stamp the sentiment on black cardstock and then fussy cut it out and added pop dots.


THANKS FOR STOPPING BY!!!

Saturday, April 20, 2019

Love Today

Hi everyone! I had some crafty time today, while cleaning and cooking for Easter, so I couldn't wait to jump on this sketch challenge from Rochelle Spears. I had a lot of fun with this sketch.  I also added in the picture challenge from Scrap With Stacy. It took a bit to figure out which picture I wanted to use but once I found this scene from our trip to Galena last year I knew it was perfect.


For the photo you have endless options for inspiration.  I chose the green grass and being outdoors. For my papers and embellishments I used a kit I purchased from The Scrap Room. 


Supplies: flower market papers, chipboard embellishments and dots from Carta Bella and Elizabeth crafts stitched circles dies


Monday, April 1, 2019

Class of 2013 S~N~S #174

Hi everyone. Thanks for visiting today for another great Sketch~N~Scrap sketch challenge.  I used this sketch as a second page for a two page layout of my niece's senior photos. 


Here is my finished layout.  


Now it's your turn.  Get srappin' and upload your design on the website! Can't wait to see what you've come up with.

THANKS ~ FRESHLY MADE SKETCHES #673

  Hi everyone! Today, I'm sharing a fun card I made using Freshly Made Sketches, sketch #673.  I have been working hard the last few mon...