Showing posts with label mixed media. Show all posts

Sunday, July 4, 2021

STUNNINGLY STYLED STENCILS + 2 CARDS

 Hi everyone! I'm back today with projects for my third class in my level 3 Altenew Certification. I has so much fun learning different techniques for using my stencils. Things I never would have even considered. 


I always forget I have so many stencils and taking this class really helped me to see so many great ways to use them and get them out of the box. 


This first card was a fun. I ink blended the background over the stencil and then dry embossed it. I haven't dry embossed before and I'm glad it came out okay. I did have to purchase plates though as I didn't have the right sandwich for my machine.


This card has so much texture. I usually don't add so much dimension but this card just called for it. 


I wanted to make this next card because I really liked the technique of mixing the embossing paste with the watercolor brushes refills. 


I didn't think the colors would pop as much as they have on this card. I couldn't be happier with how this card came out. 


I used sunkissed, lagoon, and midnight violet re-inkers to create the stenciled area. 


I made such a mess with them but the colors melded together so well. I trimmed out the image once it completely dried.


I sprinkled silver embossing powder and heat set. When I started using my heat tool the colors started to get brighter as they dried. It was pretty neat to watch the color brighten. 


I finished the card with a embossed sentiment and some white satin sequins. This is a technique I will definitely be using again. Each stencil and color combo will give something different and fun!

THANKS FOR STOPPING BY!!

Sunday, June 20, 2021


Hi everyone! Diana here today sharing a fun junk journal page. I've had this Dina Wakely journal form a while now and wasn't sure what I wanted to do with it. I had it and some Rinea foil out on my table and thought why not!

I started by adding some clear gesso to the page to help the different mediums stick and to protect the back side of the journal page. 

Once I spread that over the page and let it dry I pulled out the colors of foil from the misfits pack and started to tear strips.

Over the top of each layer of foil I added I used distress collage medium to adhere them to the page.

Once I had all the foiled pieces where I wanted I started adhering down some tissue paper saying squares. I did trim some down as I didn't want them to completely cover the foiled areas 

I really like the idea of mixed media projects but never seem to know where to go with them. I just started adding different things like spray inks and embossing glaze to add dimension and color without adding tons of bulk. I used a number stencil and ink spray for my next step.

I then added some distress embossing glaze to the wet sprayed areas and embossed them. Being careful not to burn the tissue paper or foiled areas.

I absolutely love how it turned out! I can't wait to start using other products that I have to add to this journal book!


Supplies:

Rinea Foil: misfits pack

Other supplies: gesso, collage medium, distress embossing powder, ink spray, splat box

Wednesday, January 20, 2021

FUN VINTAGE CARDS WITH RINEA FOIL AND TIM HOLTZ


Hi everyone! Diana here with a fun vintage style card. Make sure to go all the way to the end as I have a second card as an extra project for you.

I started this fun card by embossing my gold/gold foiled paper with a 3-d embossing folder by Tim Holtz. I haven't used one of these before and have to say I love how, with the foil, it added a bit of vintage appeal with the texture. 


To make this panel more sturdy I did adhere it to a piece of white cardstock cut to 3 1/2" x4 1/2". I cut my card base out of vanilla cardstock and used vintage photo distress ink on the edges. I then cut a dark red panel and adhered it to the base. 


After I had all my base card elements put together I pulled out a bunch of different ephemera pieces and started choosing my design pieces. While I did this I decided to add a 1/2" strip of copper/copper foiled paper to the left side. 


I also distressed the edges of all my flower elements with the vintage photo distress ink. 


And here is my bonus card. Truth be told, I made this one first and then realized I had NO pictures!! So, I made this second one. I love both of them but this one is my favorite. 


Supplies:

RineaCopper/Gold Glossy Foiled Paper Pack

Tim Holtz supplies:

3-d texture fades embossing folder, ephemera, chipboard frames, 3-d flowers, vintage photo distress ink, chipboard sentiments

Thursday, January 7, 2021


Hi everyone! Diana here today with a fun mixed media layout using Rinea foil, paint, embossing paste and some good old fashioned paper punches. 

I found this old pic of my oldest son with his Grandma and Great Grandma on his 5th birthday and knew I needed to create a layout with this treasure. We've lost both in the past 10 years so this is such a special gift. 

I started my layout by cutting this great title cutout from the sillouette design store. I then glued it down to my foil and started cutting it out. I then prepare my background cardstock by adding white gesso.

I left this to dry. Once it was I picked out a fun confetti stencil, embossing paste, and a fun yellow ink refill to create texture on my background.


I then smeared it on my background through the stencil. I moved it around three times. After it dried I realized there just wasn't as much color as I was hoping for.


I pulled out some yellow/gold paint and added some water. This paint has such a great shimmer to it. I started adding it over some of the embossed background. I then did some splatter with what I had remaining on the pallet.

I pulled out some of my "birthday" themed punches and some different patterned papers and started punching different shapes. I then adhered my title and picture down. 

Here are some close ups of my finished layout with all the elements added on. 

I love the how shiny the foiled paper is. Really adds a little more pizazz to my layout. 

I used two different patterned papers under my photo as well as some gold foiled paper with a torn edge to give some texture. 

This is the first time I've used a cut file like this on a layout and i must say I am hooked! I can't wait to cut some more and see what comes of them!!

Supplies:

Cobalt/Gold Glossy Foiled Paper

balloon, tag, and pennant paper punches, paint, water, embossing paste, confetti background stencil, patterned paper. 
Tuesday, January 5, 2021

SENDING ALL THE LOVE

 Hi everyone! Back with another fun challenge over at


Today's challenge is: LOVE 

I had so much fun creating this card! I made two fun backgrounds by mixing some distress inks. This one really seems to glow in the center and I thought it was perfect for a heart card. 


Originally I was going to cut two detailed hearts from the gradiant washi tape I pulled out but it just didn't work. So instead I cut around the outer edge of the heart and then added a paper cut detailed heart inside.  To add a bit more of the gradiant color I created a sentiment strip across the bottom. 


As I use my distress inks more and more I am getting more comfortable with using them and love how my projects turn out. 


FUN PENGUIN PLAY ARTWORK


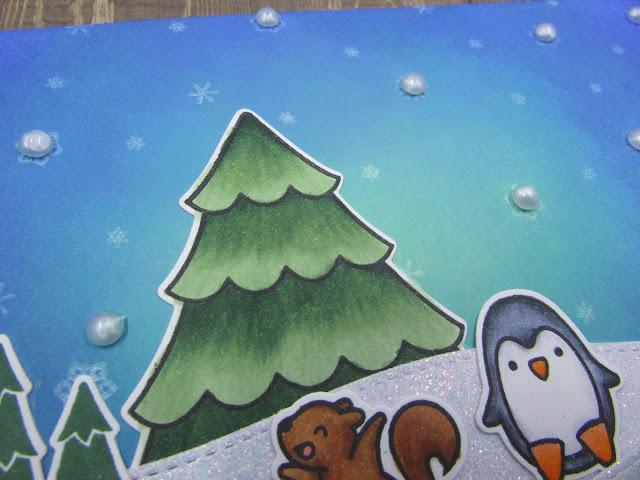
 Hi everyone! Diana here with a fun wintery scene that you can add to the front of a 5x7 card or place in a frame and use as winter decor. 


I had a lot of fun creating this winter scene. I've gotten into Lawn Fawn stamps lately and can't wait to get them out and start coloring them!

 I used cracked pistachio, peackcock feathers, and blueprint sketch distress oxide inks. Using the lightest to darkest I blended them together to get a beautiful night sky for my scene. I love how it created a glow around my tree. 


Once I had the background done I used a variety of small snowflake stamps with pigment white ink on the upper background area and let it dry. While this was drying I stamped and colored all of my images. I then cut some hills out of sparkle cardstock and started creating my scene. 

Once it was all put together I pulled out my black/white/silver dew drops and added some of the white ones to the snowflakes. 


Once it was all put together I pulled out my black/white/silver dew drops and added some of the white ones to the snowflakes. 

Supplies:

Robin's Nest: black/white/silver dew drops 

distress oxide inks, blender brushes, sparkle cardstock, lawn fawn stamps

THANKS ~ FRESHLY MADE SKETCHES #673

  Hi everyone! Today, I'm sharing a fun card I made using Freshly Made Sketches, sketch #673.  I have been working hard the last few mon...