Showing posts with label ink blending. Show all posts

Sunday, July 4, 2021

STUNNINGLY STYLED STENCILS + 2 CARDS

 Hi everyone! I'm back today with projects for my third class in my level 3 Altenew Certification. I has so much fun learning different techniques for using my stencils. Things I never would have even considered. 


I always forget I have so many stencils and taking this class really helped me to see so many great ways to use them and get them out of the box. 


This first card was a fun. I ink blended the background over the stencil and then dry embossed it. I haven't dry embossed before and I'm glad it came out okay. I did have to purchase plates though as I didn't have the right sandwich for my machine.


This card has so much texture. I usually don't add so much dimension but this card just called for it. 


I wanted to make this next card because I really liked the technique of mixing the embossing paste with the watercolor brushes refills. 


I didn't think the colors would pop as much as they have on this card. I couldn't be happier with how this card came out. 


I used sunkissed, lagoon, and midnight violet re-inkers to create the stenciled area. 


I made such a mess with them but the colors melded together so well. I trimmed out the image once it completely dried.


I sprinkled silver embossing powder and heat set. When I started using my heat tool the colors started to get brighter as they dried. It was pretty neat to watch the color brighten. 


I finished the card with a embossed sentiment and some white satin sequins. This is a technique I will definitely be using again. Each stencil and color combo will give something different and fun!

THANKS FOR STOPPING BY!!

Sunday, December 20, 2020

PEACE & JOY WITH RINEA FOIL

 Hi everyone! Welcome back to another design team project for


Today I created a soft and serene winter scene for you.


I started this card by blending two distress oxide blues on the background to give a pretty snowy look. 

Once I finished the blues I used the new distress oxide color rustic wilderness on the bottom half to blend in with my trees.


I, then, used Tim Holtz arctic cover plate to get the snowflakes from the Turquoise/Turquoise starstruck foiled paper


Next, I used Tim Holtz tree line die and cut it four times. Twice from white cardstock and once from two different green colored cardstock.


To create the white caps I cut the tip off of each white tree and adhered them onto the green tree lines.


I wanted to add a bit more foiled paper so I cut my sentiment from Silver/Silver starstruck foiled paper. I also cut it out three times from white cardstock and layered them on top of each other to give some dimension. 


Closer look at the process of layering. I love doing this as it gives more stability and I don't have to cut up any foam!

Once I have all of these pieces done I start putting my card together adding the two layers of trees with the lighter set in the background. 


To finish off the bottom I cut a strip of white cardstock to look like snow drifts in the forest and add a touch of tumbled glass distress oxide to it. I then add the snowflakes around the trees and off the edges. 


The final step is adding the sentiment. I didn't want to cover up the trees so I added it in the upper left hand corner. In this picture you can really see the dimension the layers add. 


 A closer look at the sky and snowflakes. 


Supplies:

Rinea: Silver/Silver Starstruck foiled paperTurquoise/Turquoise Starstruck foiled paper

Tim Holtz: tumbled glass, rustic wilderness, and broken china distress oxide ink, tree line & arctic thinlit dies, 

Catherine Pooler: peace & joy die

THANKS FOR STOPPING BY!!


Saturday, November 28, 2020

JINGLE ALL THE WAY TAG

 Hi everyone! I'm here to share a fun tag I made. I used a few different techniques on this one. I wasn't to sure about it at first but I really like it now that it's all finished.

I started out by using a peppermint stencil on the background, following it up with a Merry Christmas and dotted stencils in different distress oxide inks. 

I used the new presents die from Tim Holtz and cut out so many presents lol. I have quite a few left over. I see some birthday cards in my near future. 


I finished it off by layering the presents on the tag and then adding some washi tape in sparkle and word type. For the main image I used two different distress embossing powders mixing them slightly to get a nice blend. 

Supplies: Tim Holtz unless otherwise stated

DIES: arctic & tree line thinlit dies, gift wrap bigz die

INK: crackling campfire, rustic wilderness, and blueprint sketch distress oxide inks, embossing pad

Stamp set: bold tiding 3

Stencils: buuble, peppermint, and merry christmas

Accs: christmas label tape, designer tape tidings, crackling campfire & rustic wilderness embossing glaze

THANKS FOR STOPPING BY!!
Wednesday, October 7, 2020

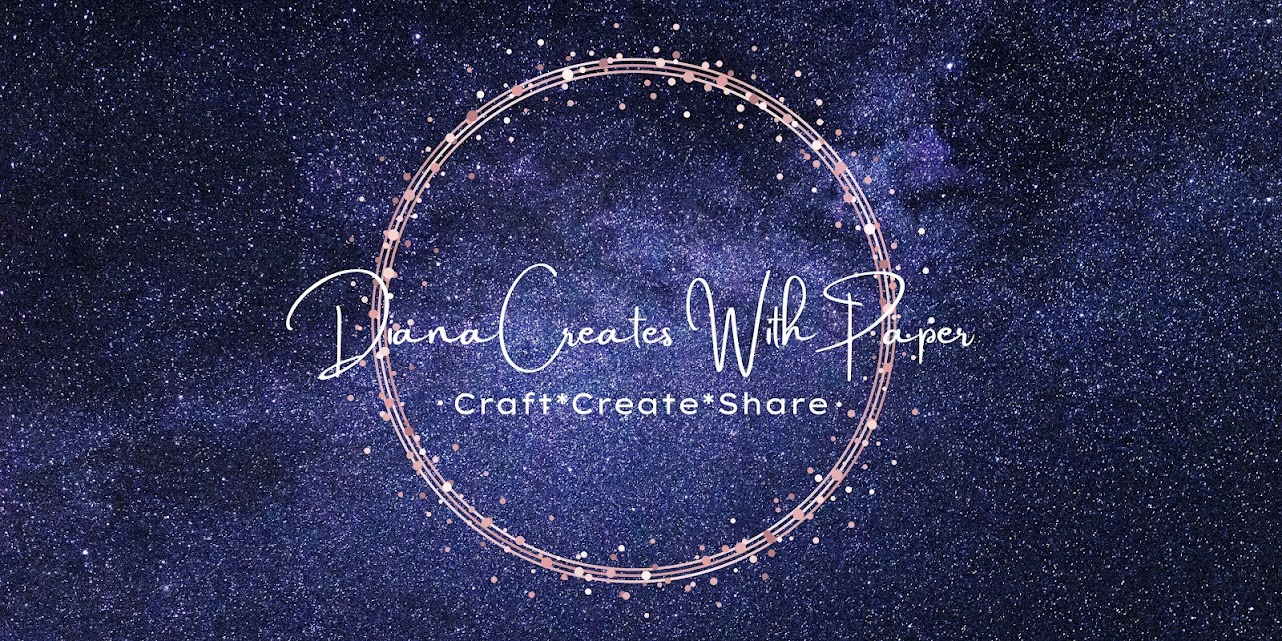
COFFEE + BIBLE = HAPPINESS COLLABORATION WITH JOY CLAIR

 Hi Everyone! I have a fun Collaboration between 

AND


 I really enjoyed using the stamps/digi stamps I received as part of this collab and couldn't wait to share with you! I chose some fallish style stamps since October was the chosen month for us. 


Supplies used: 
Altenew: Artist Markers
Pinkfresh Studios: slim ornate banner die
Neenah solar white 80lb cardstock
Michaels: orange jute

HOW TO: 

Using the slimline ornate banner dies I created a slimline card. I then cut the two layers using the remaining two dies, one in each color of Rinea foiled paper. 


In order to make it a card I cut my white cardstock to 7" x 8 1/2" and scored/folded it at 3 1/2". Placing the die so the top and side where the fold is, is not on the paper.


Once I had my card base I started stamping around the outer edges using the rustic occasions sentiment stamp set and CTMH inks. 


After I got the outer edges all stamped I then took the next two dies and cut them from the ruby/ruby and mocha/mocha starstruck foiled paper. 


I then started coloring in the images I planned to use on my card. I trimmed out the coffee cut and the sentiment to over lay on it.  I then adhered two leaves to the upper panel and then adhered the ruby/ruby panel over them. 


Using a 1 1/4" square punch I punched out three squares. Using the same ink colors I did some ink blending. I realized after I had it added onto the red panel that I didn't need the middle one. 


I realized after I had it added onto the red panel that I didn't need the middle one.


I then added some adhesive backed foam tape to the back of my coffee cup and added it to the front of my card. Then I adhered the sentiment over the center of the cup.


I'm really happy with the way this turned out being that it's my first ever slimline card. I can't wait to pull out some of my other slimline dies and get making more. Who knows, maybe that's what I'll do for my Christmas cards this year!!

Friday, March 27, 2020

Easy Ink Blending Cards


My next card is for the Altenew Easy Ink Blending Card Technique Class. I really enjoyed this one. I love ink blending and how it looks and I learned some new ways to make it look more seamless and it flows together so much better. 

I ended up making two almost identical cards because I forgot to stamp the first one on watercolor cardstock so I could do some "fake" water coloring. That's okay though, I have two cards to send out now instead of one and it really didn't take much more time.

This first picture is of both cards. The one on the left is the "watercolor" card and the one on the right is regular ink blending. The watercolor card blended more smoothly together and when I added the spray of water The Altenew inks I used blended together even more.  I then stamped some of each color onto my media mat and using a paint brush I added just a tad more color to the dry cardstock. 


Here is a closer picture of each of the cards.  To give some dimension I used some cardstock that I couldn't use as part of a project and layered them behind my panels. This gave some great depth and I didn't have to waste the useless cardstock. 


I used the Larkspur stamp set as my main focal point and stamped them with embossing ink and embossed with white embossing power. I stamped each flower individually so that I could over lap them a bit. I also used halftone hello for both sentiments.  The inks I used were fresh lemon, frayed leaf, aqualicious, hydrangea and jet black. 


THANKS ~ FRESHLY MADE SKETCHES #673

  Hi everyone! Today, I'm sharing a fun card I made using Freshly Made Sketches, sketch #673.  I have been working hard the last few mon...