Saturday, November 28, 2020

JINGLE ALL THE WAY TAG

 Hi everyone! I'm here to share a fun tag I made. I used a few different techniques on this one. I wasn't to sure about it at first but I really like it now that it's all finished.

I started out by using a peppermint stencil on the background, following it up with a Merry Christmas and dotted stencils in different distress oxide inks. 

I used the new presents die from Tim Holtz and cut out so many presents lol. I have quite a few left over. I see some birthday cards in my near future. 


I finished it off by layering the presents on the tag and then adding some washi tape in sparkle and word type. For the main image I used two different distress embossing powders mixing them slightly to get a nice blend. 

Supplies: Tim Holtz unless otherwise stated

DIES: arctic & tree line thinlit dies, gift wrap bigz die

INK: crackling campfire, rustic wilderness, and blueprint sketch distress oxide inks, embossing pad

Stamp set: bold tiding 3

Stencils: buuble, peppermint, and merry christmas

Accs: christmas label tape, designer tape tidings, crackling campfire & rustic wilderness embossing glaze

THANKS FOR STOPPING BY!!
Friday, November 27, 2020

WHAT MILK?

 Hi everyone! Back again with another fun challenge over at


This weeks challenge is: Christmas Animals

For my card I used this cute image from the Tim Holtz Stamptember 2020 stamp set. This is the first time I brought this out and love, love, love how this card turned out. 


I started out by by using distress oxide in four different colors and blending them together to create the colorful background.


Once I blended I used my distress water bottle and added drops to the background and dried them up with my tim holtz heat gun. I did this step several times to get the look I wanted. 


Once the background dried I used the multi snowflake background stamp in archival black so that it wouldn't wipe off and added red glitter stickles in the center of all the flakes that are visible. 


I used the Tim Holtz snow globe die with the base and cloud to great my snow globe. Using a light blue distress oxide I created the light color inside the globe and used a tad darker blue on the clouds. 


THANKS FOR STOPPING BY!!

Wednesday, November 25, 2020

ANGEL THANKS

 Back again with another fun challenge over at

As always anything goes

Our two sponsors this challenge are


Prize: 2 digi images of the winners choice


Prize: 3 digi images of winners choice

For my card today I used ANGEL LULU from Paper Nest Dolls. This image is so sweet. I really enjoyed getting to color her.


I used a fun border die set i have to create the outer scallop and then used the inner piece and my background. To help "ground" her I used a strip of paper in a grey shade and added some die cut banners to the right side.


I wanted to give a more angelic look so I fussy cut her out and popped her up using foam. I added her halo the same way. 


THANKS FOR STOPPING BY!

Monday, November 23, 2020

SLEIGH BELLS RING

Hi everyone! I'm here today sharing a fun slimline Christmas card. I had to much fun creating this card. I don't usually use multiple stamp sets on my cards but I think after this card I'm going to start! I love how it all came together!


I recently purchased a few Christmas sets from Pinkfresh Studio and Catherine Pooler Designs and these set's work great together!


I created the sky using stormy sky and blueprint sketch and blended them together to give it a look as if it's snowing.

For the snow I used the stitched slimline snowdrift dies from MFT. I used all three dies to create the rolling hills for the trees. 

I stamped all my images and colored in those that needed coloring with my Altenew artist markers and got busy creating my scene. 

The cute bear was an add on after I had the card all done lol. He was left over from a card you can see HERE. Once the card was finished it just felt like something needed to be on that end. 


 The last steps were adding in the snowflakes and sequins. I'm the type of stamper who, no matter how hard I plan, always adds things after the card is put together. Like the snowflakes lol. I wasn't going to but once they were on there it was perfect. 

SUPPLIES:

Pinkfresh Studio: sleigh bells ring stamps, sleigh bells ring dies, tree trimming friends stamps, tree trimming friends dies

Catherine Pooler Designs: jolly trees stamps, jolly trees dies, rouge, deck the halls, eucalyptus, spruce, and green tea inks, glacier bay sequins

My Favorite Things: stitched slimline snowdrift dies

Altenew: artist markers, permanent black crisp ink, mini blossom die cut machine


Friday, November 20, 2020

HAPPY HOLIDAYS RINEA COLLABORATION W/ CRACKERBOX & SUZY STAMPS

 Hi everyone! Back again today with our second collaboration with 


And


Today I have a fun and sparkling holiday card that's easy to make and can be changed to use what ever you may have on hand.


To create this card I started by die cutting all of my pieces and ink blending the base piece of my card using dark green ink and a blending brush. 


Next I adhered the silver spheres around the edges of the base and added in the gold circles.


I trimmed of the overhanging pieces and added some of the scraps to fill the background in a bit more.


I was originally going to use red/gold foiled paper as my first layer but wanted something a bit less shiny as I have so much amazing foil already. I used a sheet of red cardstock and re cut the base piece. 


I started arranging all of my elements. I did ink blend on the background of the sentiment and the presents so they'd blend in better. 


I added a lot of dimension to this card. Lately it just seems like all my projects need it lol. 


Supplies:
Crackerbox & Suzy Stamps: happy holidays, gift pile
Altenew: mid-century frame die, permanent black ink
Catherine Pooler: A-maze-ing mini cover plate die, deck the halls ink
Close to my Heart: milan color pencils, silver shimmer trim
Stampin' Up!: real red and whisper white cardstock

THANKS FOR STOPPING BY!!


Tuesday, November 17, 2020

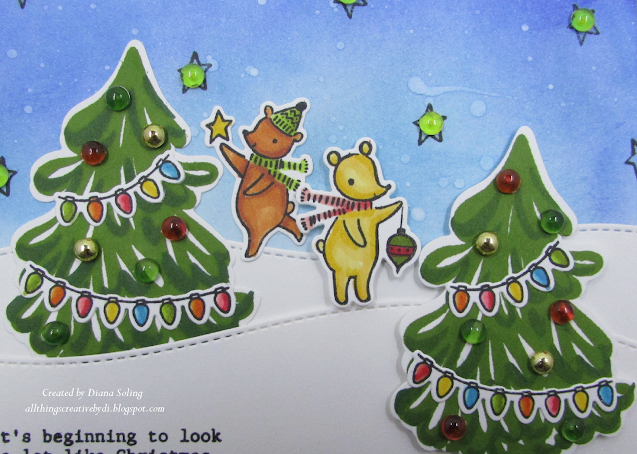
BEGINING TO LOOK LIKE CHRISTMAS: A DEW DROP CARD

 Hi everyone! I have another fun project to share for


 I pulled out some new stamps and dies and got crafty! I've seen a lot of different snow drift cards and I really wanted to give it a try!


To create this card I started out with slimline snowdrift dies. I put them down on either side of a  sheet of cardstock and cut them out. then I adhered them together at the bottom. Next I took two shades of blue and created the starry night sky.


Using my new stamps and dies from lawn fawn I stamped the two trees, four strands of lights, and three critters (only two made it on the card)


I then colored in the lights and critters and started placing them around on the card. I really liked putting one of the trees behind a drift and having the bear trying to put the star on. I used some dimensional foam on the tree in the front and the cute dear handing the ornament.


I finished the card off with stamping some stars in the sky and then adding in dew drops as ornaments and in the stars. 

SUPPLIES:    
Stamps/Dies: tree trimming friends-lawn fawn, stitched slimline snowdrift dies-MFT
Inks: Pinkfresh studios: evergreen, olive, sapphinre, summer shower, espresso, Altenew: permanent black
Markers: Altenew artist markers
Cardstock: Neenah solar whie 80 lb

THANKS FOR STOPPING BY!!


Friday, November 13, 2020

GOOD LUCK

 Hi everyone! I have a fun card to share today for my design team project over at


Our theme this challenge is GOOD LUCK 

As I was coming up with my card I realized I don't have a single stamp, sticker or stencil that says good luck! How crazy. I did realize I have way to many birthday stamps though lol.


I looked through the cricut design studio and found this cut file. I thought the script worked great with the overall feel of the girly feeling. 


At first I wasn't to sure that I liked this card. I really wanted to use this new cover plate die! Once I added the sequins it all fell together. 


Supplies:

Close to my heart: olive branch background thin cuts, bloom with grace paper pack & stickers

Wednesday, November 11, 2020

HELLO

 Hi everyone! I'm here with another fun card for the challenge over at

As always the challenge is ANYTHING GOES

We have two great sponsors this week and they are


Prize: $10 store voucher


Prize: 2 digi images of the winners choice

For my card today I used the SUMMER TRAINERS digi stamp from All Dressed Up. 

I wanted my image to pop off the card so I left the background all white and then added some colorful layers behind it. 


This was a fun image to color. At first I thought I'd go more fall colors due to the season but I decided on going brighter.


I have a bad habit of not thinking about a sentiment until the card is already put together lol. I found this great die in my stash and was so happy to see it worked!


THANKS FOR STOPPING BY!

Saturday, November 7, 2020

WINTER TAGS COLLABORATION WITH RINEA AND CRACKERBOX & SUZY STAMPS

 Hi everyone! I am so exited to share my projects with you today. Today's are a bit more special as we here at


are collaborating with


Before this collab I hadn't heard of Crackerbox & Suzy Stamps. I feel like I was missing out! They have some cute stamps and some snarky one's for us more smarty pants people. 


I started making my tags by die cutting two different tag shapes from white cardstock. For my images I put them all into my misti stamping tool and stamped them all at the same time in crisp black ink. 

For the first tag I used an embossing folder with ink on the inside top panel in a baby blue ink color. 


I then placed my first tag inside the folder.


 The effect you get by doing this technique is stunning. It makes the image/words stand out and puts just the right amount of color on the tag. 


I then took my Rinea foiled paper and cut out three shapes in three different colors. I glued them down using my liquid glue. 


Once I cut the edges off I added a few of them to other areas of the tag base.


I then set about creating the rest of my tag by adding my stamped images and sentiment.


For my second tag I used a snowflake embossing folder and embossed my foiled paper.  


I then took my tag base and glued it to the back.


I  then started to add more foiled paper to the front. Cutting the strip off the base and turning it over to get the gold strip. I also cut another tag shape from the silver foiled paper and adhered it on top. 


Once that was done I could start adding my image and sentiment. I wanted Santa to be the focal so I fussy cut around the sentiment to make it more stream lined. I used the same baby blue ink from above around all the edges. 


And here is the complete finished project. There are so many things you can do with these. You can add them to packages, scrapbook layouts, cards and so much more. 


Here are some close ups of both of the tags and a supply list

SUPPLIES:


 Teriffic Tags Die Set
Soda Top Nesting Dies
Permanent Black Crisp Die Ink

 Glacier Bay Sequin Mix
It's A Boy Ink Pad

Snowball Fight Embellishments
Dazzling Holidays Embellishments
 
OTHER SUPPLIES
white cardstock, snowflake embossing folder, Christmas word embossing folder. 


THANKS FOR STOPPING BY!!


QUICK & EASY CHRISTMAS CARDS

  Hi everyone! I wanted to share a quick post on how I made my Christmas cards this year. I have been so busy lately with school, work, and ...